Category Archives: Feature How To’s

Automatically Reclaim Disk Space – a new feature in Parallels Desktop 16


This post is part of a series about new features in Parallels Desktop 16

Parallels Desktop is like having a Windows PC inside your Mac. In some ways, it’s better – after all, can you drag & drop a file from your Mac to a PC? Nope! In other ways, it’s just different, and the virtual hard drive component of a Parallels Desktop virtual machine (VM) is one of those differences. In this blog post, I will outline some of the differentiators between a hard drive and a virtual hard drive, and explain how the new feature, “Automatically Reclaim Disk Space”, assists in reducing wasted space on your Mac hard drive or SSD.

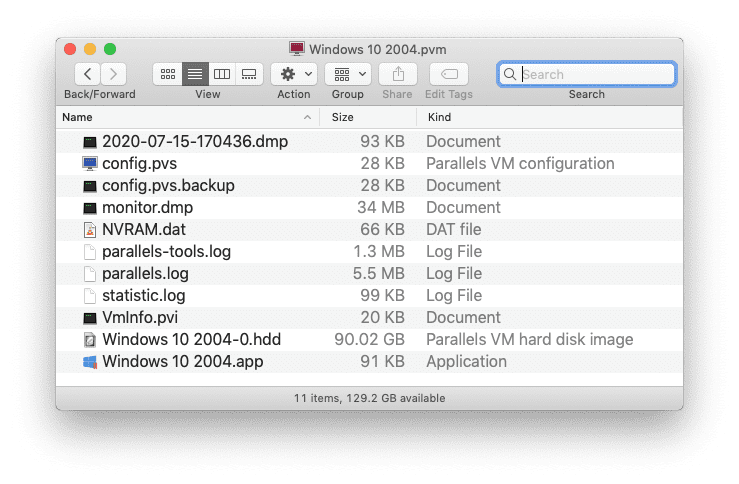
On a Mac, the “Macintosh HD” is the main storage. On a Parallels Desktop VM, the main storage is a file on your Mac where Windows, Windows apps, and your Windows documents (in some cases) are stored. Table 1 lists some of the characteristics of these two kinds of storage. 

  Mac  Windows VM 
Name  “Macintosh HD” (default)  Local Disk (C:) (in Windows)  (VM name)-0.hdd (on Mac) 
File type  Volume  .hdd file in the macOS 
Stores  – macOS  
– Mac applications  
– your documents  
– Windows  
– Windows applications  
– your Windows documents (in some cases)  
Size Characteristics  Fixed  – Maximum size set at creation  
– Maximum size can be increased or decreased  
– Actual size increases or decreases, as needed  
   

The actual amount of space that the virtual hard drive occupies on your Mac main storage grows as you install Windows apps and Windows documents, and in many cases, shrinks as you delete apps or documents. The notable exception to this is a Windows Update. 

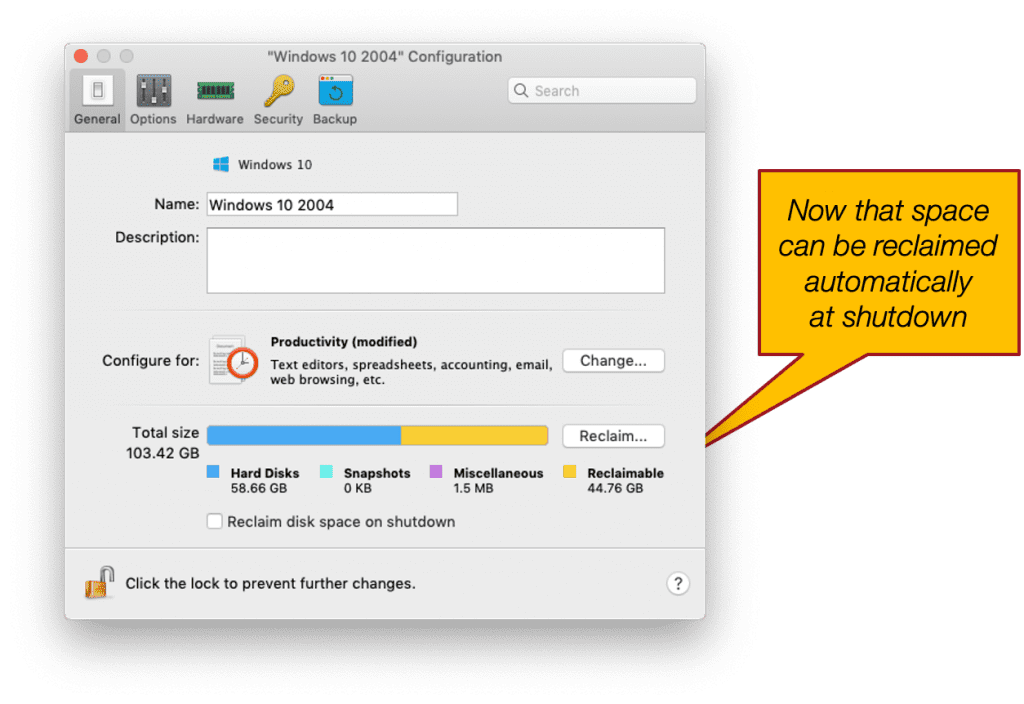
Windows Updates often require extra space for the download and for temporary files needed during the update, so the actual space needed by the virtual hard drive will often grow during the update process. While Windows removes the download and the temporary files at the conclusion of the update, the virtual hard drive doesn’t usually shrink after these are removed. This can lead to a situation in which there is unused space inside the virtual hard drive. Over time, with subsequent Windows Updates, this unused space can grow to many gigabytes. Figure 1 shows the result of one Windows 10 VM in Parallels Desktop 15.

Figure 1_Parallels Desktop 15 Reclaim Button

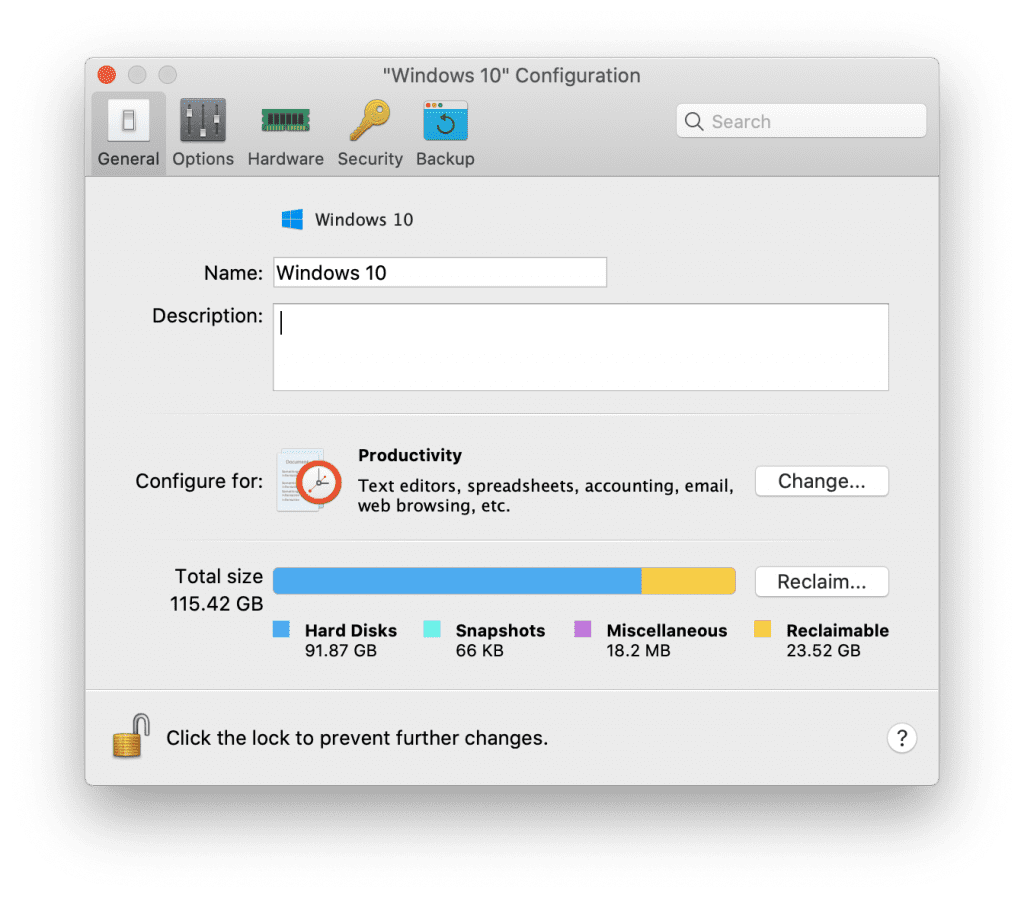
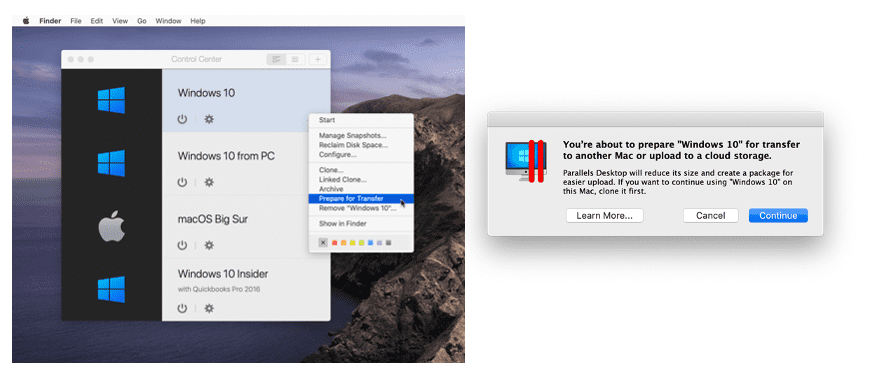
Now, the Parallels Desktop 15 user in the situation shown in Figure 1, could recover 23.52GB of empty space in the VM if they remember to open the configuration dialog and click on the “Reclaim” button. However, many people forget to do this. I like to think that I am an experienced Parallels Desktop user, but I often forgot to do this.

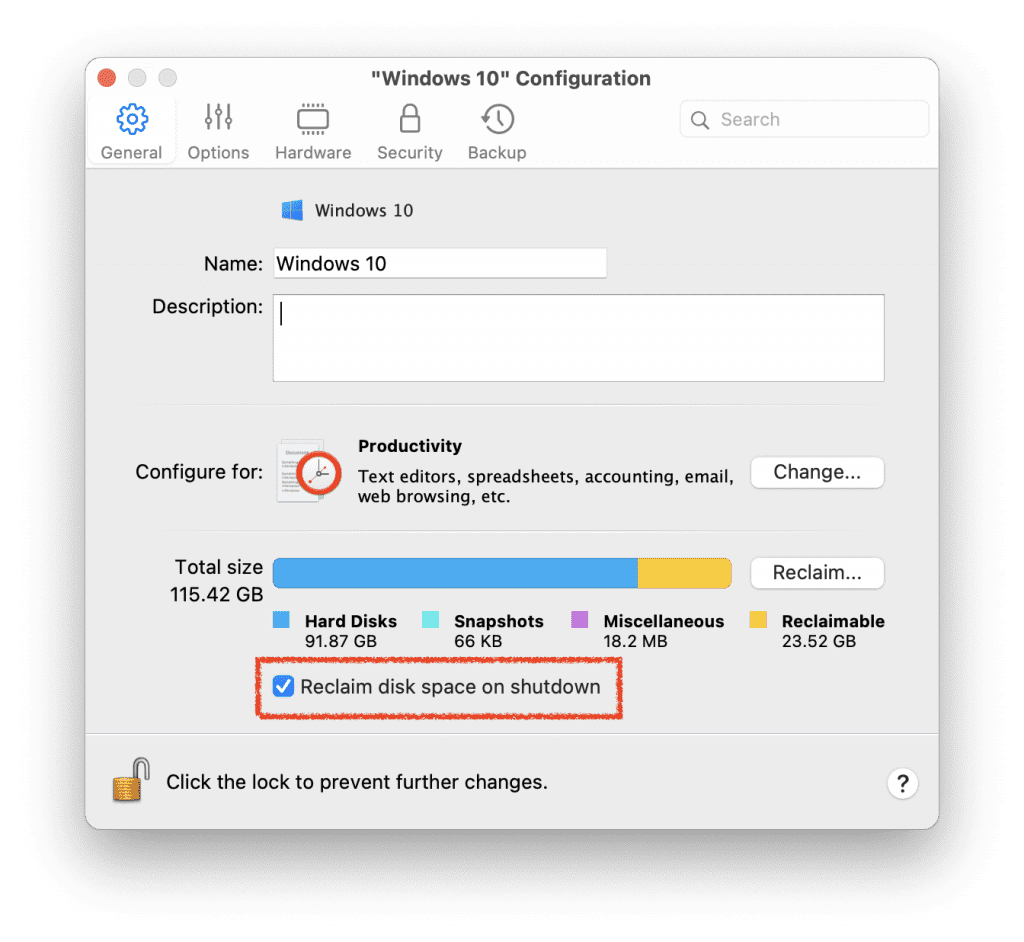
So, in Parallels Desktop 16, we added an option to do this automatically, as shown in Figure 2. After shutting down this VM, there will be approximately 24GB more space on the Mac main storage.

Figure 2_Parallels Desktop 16. Reclaim at Shutdown option

All that said, there is no free lunch. Reclaiming space takes some time, with the two most important variables being the overall size of the VM and the amount of space to be reclaimed. For the VM in Figures 1 and 2, this reclamation took about 17 minutes on my MacBook Pro. So, if you are the type of person who wants to shut down the VM, close the lid on your laptop, and run to your next meeting, you may not want to use this new option on a busy day filled with many meetings. On the other hand, if you are using a stationary iMac or a Mac Pro, then this option will help you avoid filling up your drive so quickly.

I hope this gives you a useful overview of this new feature in Parallels Desktop 16. Let us know in the comments how this feature is working for you. 

Feel free to test Parallels Desktop 16 for Mac for 14 days for free

The post Automatically Reclaim Disk Space – a new feature in Parallels Desktop 16 appeared first on Parallels Blog.

New in Parallels Desktop 16 – “Prepare for Transfer”


This post is part of a series about new features in Parallels Desktop 16

Deploying a virtual machine (VM) can be cumbersome for two reasons:  

  1. It can be pretty large—sometimes 100s of gigabytes.  
  1. It is in a Macintosh-only file format.  

The new feature, “Prepare for Transfer”, addresses both of these concerns, and it is a feature in the Parallels Desktop Pro Edition and Parallels Desktop Business Edition

First, let’s talk about size. Even if there is room, most VMs can’t be copied to USB thumb drives because the size of the VM is too large for the way in which most thumb drives are formatted. In the case of the thumb drive in Figure 1, it was formatted in FAT32 (MS-DOS) so that it could be used with both a Mac and a PC.

Transfer VM
Figure 1_Even if there is room, most VMs can’t be copied to a USB Thumb Drive

The maximum file size for FAT32 is 4GB, and the VM I attempted to move is more than 9GB in size. 

I did I quick survey of the VM sizes on my Macs. The smallest is 9.39GB; the largest is 262GB; and the average seems to be around 30-40GB. Moving a 90GB VM from one hard drive to another takes about 130 minutes; moving to an SSD takes about 50 minutes; and I don’t even want to think about moving a 90GB VM to Dropbox or OneDrive, but I suspect it would take more than 20 hours. 

And, there is the issue of file format. Parallels Desktop VMs are stored as Mac packages. A package is basically a folder masquerading as a single file. You can force the Finder to show you the inside of a package, and Figure 2 shows the inside of one of my VMs.

Transfer VM
Figure 2_Inside the VM package

Packages are only supported on the Mac or an iOS device, so cloud storage systems aren’t really equipped to deal with packages, but they do the best they can. 

A Parallels Desktop power user, and especially an IT Admin who manages the Parallels Desktop deployments inside a company, often need to move VMs around and generally use non-Apple file servers and other devices. For this reason, IT Admins told us that help in moving/deploying VMs is high on the list of requested improvements for Parallels Desktop. This was the motivation behind the new “Prepare for Transfer” feature in Parallels Desktop 16, which compresses the VM and converts it to a single zip file that any system can handle. 

A Pro or Business Edition user just has to right-click on a VM in the Control Center to access this new feature, as seen in Figure 3. Choosing this menu command presents the dialog also shown in Figure 3.

Transfer VM
Figure 3_Preparing a VM for transfer

When the compression and conversion is finished, the VM appears in the Control Center as a “package”, as shown in Figure 4.

Transfer VM
Figure 4_The compressed VM in the Control Center

A single menu command will decompress this package into an ordinary VM, as shown in Figure 5. 

Transfer VM
Figure 5_Decompressing a VM is a single menu command

So, how long does it take to compress and decompress a VM, and what compression savings does it achieve? While the CPU speed on the Mac and the speed of the disk drive or SSD are factors, the only remaining important variable is the size of the VM. I took some quick measurements on my MacBook Pro to give you some idea of the time involved, and they are shown in Table 1. 

OS  VM size (GBs)  Compressed size (GB)  Compression Time  Decompression Time 
Windows 10  10 GB  5 GB  1 minutes, 
5 seconds 
21 seconds 
Ubuntu  11 GB  5 GB  1 minute, 
26 seconds 
24 seconds 
macOS Big Sur  31 GB  23 GB  4 minutes,  
15 seconds 
1 minute, 
19 seconds 
Windows 10 Insider Preview  262 GB  200 GB  38 minutes, 
31 Seconds 
11 minutes, 
52 seconds 

I hope this gives you a useful overview of this new feature in Parallels Desktop 16. Let us know in the comments how this feature is working for you. 

Feel free to test Parallels Desktop 16 for Mac for 14 days for free

The post New in Parallels Desktop 16 – “Prepare for Transfer” appeared first on Parallels Blog.

New in Parallels Desktop 16 – Synchronized “Do Not Disturb”


This post is part of a series about new features in Parallels Desktop 16

“I turned on ‘Do Not Disturb’, but I am still getting annoying alerts. Make them stop!” 

For most people, the idea of running two operating systems at the same time is pretty strange. So, it is not surprising that when they change a setting in one operating system, they don’t even think about the other operating system. And, that is certainly the case with the “Do Not Disturb” setting. 

Both the macOS and Windows OS have a “Do Not Disturb” setting. That said, in Windows it is called “Focus Assist”. (Figure 1)

Figure 1_Do Not Disturb in Mac and Focus Assist in Windows

Mac users will certainly go to the Mac setting first, so in Parallels Desktop 16, the Windows Focus Assist setting is synchronized with the Mac Do Not Disturb setting. Change the Do Not Disturb setting on the Mac, and Parallels Desktop changes the Focus Assist setting in Windows, as you can see in this video: 

The Do Not Disturb setting is even more readily available in macOS Big Sur because of the new Control Center item in the Mac menu bar, so this synchronization will be even more useful when you migrate to macOS Big Sur in the Fall. 

Have you updated to Parallels Desktop 16? When are you planning to update to macOS Big Sur? Let us know in the comments or on Facebook or Twitter.

Feel free to test Parallels Desktop 16 for Mac for 14 days for free

The post New in Parallels Desktop 16 – Synchronized “Do Not Disturb” appeared first on Parallels Blog.

Can you install the macOS Big Sur public beta in a VM?


Can you install the macOS Big Sur public beta in a VM?

Quick answer: Yes 

The details: Now that Parallels Desktop 16 has been released, I am able to talk about this new version of Parallels Desktop that I have been using for about the last six months. 

I was able to install the macOS Big Sur public beta in a VM. In fact, this is my preferred way to test out a new OS that is under development, and I have been doing so for years. OSes under development can have significant issues, and if you test them out in a VM there is no risk to your Mac. 

Can macOS Big Sur be installed in a Parallels Desktop 16 VM? 

Yes, it can, but an additional variable to consider is the host OS. 

On a Catalina host 

I encountered no issues at all, but it did take a while. A large portion of this time was downloading the “Install macOS Big Sur public beta” app—a 12.3GB download! 

Normally, installing the Parallels Tools in a new OS under development is a mistake. The Parallels Tools are individually designed for each guest OS. While it is possible, having the Tools for an older OS work in a newer OS is unusual. Installing older versions of Tools can sometimes cause an OS to “lock up”. So, what I usually do is not install the Tools by default, make a copy of the Tool-less VM, and then see what happens when I install the Tools. 

I did this for the Big Sur VM on my Catalina host, and the Parallels Tools did not cause any issues. Not everything worked perfectly, but it is quite usable. 

On a Big Sur host 

This went perfectly and everything I have tested works fine. However, I am not a professional tester, so I will wait to hear the experience of the engineers in the Parallels QA team. 

Can macOS Big Sur be installed in a Parallels Desktop 15 VM? 

On a Catalina host 

The answer is “yes” this can be done, but there are several gotchas to worry about. My first three attempts did not succeed, but on the fourth try I did get it to work. 

I will wait until macOS Big Sur is released to share images and videos of the installation and use of a macOS Big Sur VM in both Parallels Desktop 15 and Parallels Desktop 16. Perhaps some of the issues I encountered will be gone in the actual customer release of Big Sur. 

If you have also started using macOS Big Sur with Parallels Desktop, please let us know about your experiences in the comments or on Facebook or Twitter.  

Please also refer to this knowledge base article for further information.

Feel free to test Parallels Desktop 16 for Mac for 14 days for free

The post Can you install the macOS Big Sur public beta in a VM? appeared first on Parallels Blog.

Just Released! Parallels Desktop 16 for Mac


It’s finally here! We’re so excited to introduce a new version of Parallels® Desktop: Parallels Desktop 16 for Mac.  

With Parallels Desktop, you can run Windows, Linux and other popular operating systems on your Mac without rebooting. For 14 years, we’ve been the #1 solution for over 7 million users worldwide. 

Learn more about the hottest new features in Parallels Desktop 16—and stay tuned for more blog posts coming this week detailing everything you need to know about Parallels Desktop 16. 

What are the top new features in Parallels Desktop 16? 


Incredibly fast  

This version of Parallels Desktop is THE fastest version ever released. It starts up twice as fast as previous versions. Plus, Windows resumes and quits up to 20% faster.  


Improved graphics 

Parallels Desktop 16 users can now run even more graphic-heavy, resource-hungry Windows apps with ease. Version 16 delivers up to 20% faster DirectX 11 and improved OpenGL graphics support for both Windows and Linux so you can run more Windows applications and games, including DIALux evo 9, ProPresenter 6, Samson Connect and more. Plus, the new version includes the world’s first support for applications with 3D capabilities running in a macOS Big Sur VM. 

Parallels Desktop users collectively run more than 200,000 Windows applications and with Parallels Desktop 16 can run even more applications.  


Ready for macOS Big Sur and other OSes 

Parallels invested more than 25-person-years of engineer programming to take full advantage of the new architecture in macOS Big Sur. We also revamped kernel extensions to deliver our best Windows-on-Mac performance ever. That’s why we’re proud to say that version 16 is optimized for macOS Big Sur 11.0 (when released) with a refreshed design, easier setup, and much more. Plus, our developers continue to update Parallels Desktop for future releases of Windows, macOS and Linux. 


Better productivity 

  • Wouldn’t it be nice to get extra screen time while traveling? Windows in Travel Mode now uses less energy and extends battery life by up to 15%. 
  • 10% of Parallels Desktop users are short on available disk space. We’ve included a feature that will help you better manage disk space, with the option to reclaim available disk space to Mac automatically. 
Reclaim space Parallels Desktop
  • Set Do Not Disturb on your Mac and Parallels Desktop will make sure that Windows 10 doesn’t disturb you either. This is especially useful when you’re in an important presentation. 
  • Do you usually work with a Trackpad instead of a mouse? Now you can zoom and rotate objects smoothly in Windows applications with Trackpad gesture support.  

Enhanced integration 

Every year we develop new features to perfectly integrate Mac and Windows with each other. In Parallels Desktop 16, we’ve added some powerful new features that make it even smoother to run Windows apps as if they were native on the Mac. 

  • Do you want to use duplex printing from Windows applications, with paper sizes ranging from A0 to envelope? Good news—you now can with new print options
Printing Parallels Desktop
  • Now you can confidently work on Mac files in Windows by engaging the “safe removal check” to ensure files in shared folders aren’t accidentally deleted.  

Linux and Mac VMs 

Everyone who is passionate about using Linux virtual machines (VMs) has reason to cheer. With version 16, you can be more productive when working with Git repositories in Linux Shared Folders with up to 75% faster “git status” execution. In just one click, you can use and download the latest Linux distributions including Ubuntu 20.04, CentOS 8, Fedora 32 and Debian 10. Plus, Linux OpenGL improvements now let you run Steam.  

Do you want to achieve picture-perfect quality and performance using macOS Big Sur in a VM? You can now, thanks to the first-in-the-world Metal graphics acceleration in a VM with macOS Big Sur. 


Parallels Desktop and Apple Silicon 

We’re all very excited about this demo shown at Apple Worldwide Developers Conference (WWDC), which depicts a prototype of a forthcoming version of Parallels Desktop running on Mac with Apple Silicon. Parallels and Apple work closely to bring virtualization capabilities to Mac with Apple Silicon. Learn more.


New features in Pro Edition and Business Edition 

For our professional and business customers, we recommend Parallels Desktop for Mac Pro Edition and Parallels Desktop for Mac Business Edition. Of course, all new features of Parallels Desktop 16 are included in these editions. Pro Edition and Business Edition now offer improved virtual machine deployment, including export capabilities to reduce the network load when deploying to many Mac devices on a corporate network. For developers, Parallels Desktop 16 enables users to name their custom networks for more organized testing.  

Check out all new features that are exclusive to Pro Edition and Business Edition.  


Special gift for Parallels Desktop users 

In all subscriptions of Parallels Desktop 16, users get more than 30+ single-click utilities from Parallels Toolbox for Windows and Mac, plus Parallels Access to remotely access your PC or Mac from your iOS or Android device or any web browser.  

Check out all the recently released features in Parallels Toolbox and Parallels Access. 

There are lots more new features to discover! Check it out yourself and let us know which feature you like most in the comments, or on Facebook or Twitter.  


How to get your copy of Parallels Desktop 16  

 If you… 

…are an existing customer, upgrade now
…are a new customer, purchase your copy here—or test it for 14 days for free
…have just recently purchased Parallels Desktop 15, check out our Tech Guarantee to see if you get a free upgrade. 

The post Just Released! Parallels Desktop 16 for Mac appeared first on Parallels Blog.

How to Create a Parallels Account Using Your Apple ID


Creating a Parallels user account, managing it and logging into applications has never been easier for Apple users. They can now use their Apple ID to create a new Parallels account in a simple, fast and safe way. Using “Sign in with Apple,” you can log into your Parallels account from any device. You don’t even need to memorize a separate password for this procedure. Your Apple password is enough.

Register with your Apple ID and save yourself from a separate password

Since 2019, Apple has allowed users to register with sites and apps using their existing Apple ID. This comes with two benefits:

  • There is no additional password to remember
  • The sign-in procedure is especially safe

What you need is an Apple ID, your Apple password and a two-factor authentication resource, such as a smartphone.

A further benefit for users is that “Sign-in with Apple” helps obscure their email addresses. They are automatically assigned “proxy” addresses, or Relay Addresses as Apple calls them. Announcements and messages coming from Parallels are forwarded to your real inbox automatically. Parallels is only provided with this alias address on your sign-in, so you’ll continue to receive important messages but your real email address remains concealed to us. Basically, this sign-in method is tantamount to an authentication by Apple.

Once you have created your account via your Apple ID, you can sign in to your browser or your Parallels applications using this Apple ID. Just select “Sign in with Apple.” If you have purchased a Parallels license any time earlier, you can easily import it into your (new) user account. You can enter your license key(s) or your previous Parallels address by selecting the “Restore Purchases” option, which will transfer your previous licenses into your new account.

This safe and consistent sign-in experience is another example of the enhanced usability of Parallels Desktop™ 15 for Mac running on macOS Catalina, which also helps users handle Parallels software with simplified security and privacy dialogs and optimized iCloud support.

Why not try and sign in to Parallels with Apple now and download a Parallels Desktop 15 trial version?

Learn more:

The post How to Create a Parallels Account Using Your Apple ID appeared first on Parallels Blog.

How to Use the New Personal Help in Parallels Access 6


Parallels Access provides an elegant and easy-to-use way to connect your phone or tablet to a remote computer that you own or control. Since its first release in 2013, Parallels Access™ has regularly added significant new features like file management, a web portal and support for split-screen multitasking on iPad.  

However, there has been one remote feature missing: the ability to connect to a friend’s remote computer to assist them with a problem. This feature is often called “Personal Help”—and the latest release of Parallels Access, version 6.0, adds this oft-requested feature.  

In this blog post, I’ll show you this feature in action, as well as how to set it up, both from the point of view of the helper and the person requesting help.

Learn more about how to use Personal Help in this short video:


Note that there a several ways to do this. Here, I am showing one way: the helper using Parallels Access on an iPad, and the requestor asking for help with a Mac task.) 

  What the helper does and sees  What the requestor does and sees 
1   – Requests help with a computer task 
2  On the new “Other Computers” tab, select the “+” button. Generate a Parallels Access email to the requestor.  (See Figure 1)   –
Figure 1_The helper initiates the process (detailed in row 2 of the above table)

  What the helper does and sees  What the requestor does and sees 
3    Download and install Parallels Access from the link provided by the helper. (See Figure 2) 
Figure 2_Downloading and Installing Parallels Access

  What the helper does and sees  What the requestor does and sees 
The requestor’s Mac is available for a connection in Parallels Access in the “Other Computers” tab. Connect to this Mac. (See Figure 3)  Allow the connection from the helper.    (See Figure 4) 

Figure 3 and 4:


  What the helper does and sees  What the requestor does and sees 
5  You now have access to the remote computer. Help with the computer task.  (See Figure 5)   
6  Close the connection to the remote Mac.   
Figure 5_Connection is established

Notice that although the requestor is giving access to their computer, they remain in control: they explicitly grant permission for each remote connection and can terminate the session at any time. 

I hope this much-requested new feature in Parallels Access enables you to provide help when asked and receive help when you need it. Let us know in the comments how it’s working for you. 

Do you need to help a friend, family member or coworker with a technical issue? Download a free trial of Parallels Access and remotely connect to their computer.  

The post How to Use the New Personal Help in Parallels Access 6 appeared first on Parallels Blog.